Monday, 30 September 2013

MAGAZINE FILES.

I wanted to get some new magazine files that were actually sturdy and could hold my school textbooks without falling apart whenever I tried to lift them up, so I went to (yeah, you guessed it) IKEA to buy this pack of 2 magazine files. These files are very strong and have metal corners and edges for extra reinforcement. They cost me £3.75 for the pack of 2 and they came flat in the packet so I had to build them myself. There were a few small slips of white card included for me to label the contents of the files, so I just made mine using a black fine liner to organise my AS and A2 Level textbooks separately. 

There are a few different colour options on the IKEA website here.


Wednesday, 25 September 2013

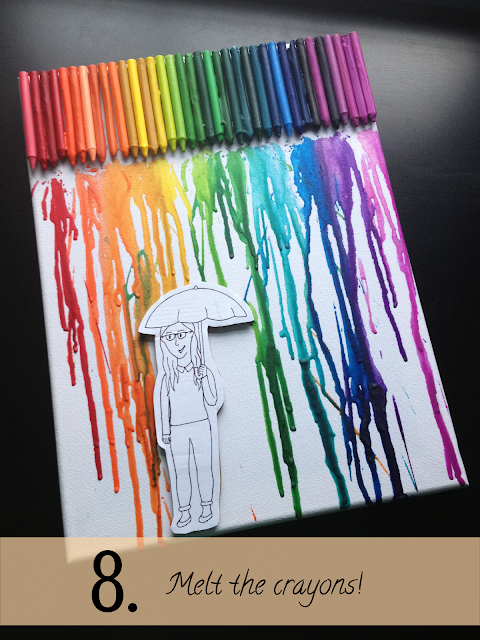
DIY PROJECT: MELTED CRAYON RAINBOW ART.

I'd seen many people on the Internet doing this awesome art project, so I thought I'd give it a go. It only cost me £1 altogether because the only thing I needed was the canvas! I found the crayons in the spare room when tidying up in there, I borrowed the hot glue gun from my nan and I already had the rest of the materials.


All the stuff you need:
  • Plain white canvas
  • A spectrum of crayons
  • Hot glue gun (with extra glue sticks)
  • Hairdryer
  • Cardboard (from an Amazon box or something similar)
  • Pencil, rubber and black fine liner
  • Sheet of white paper or card
  • Scalpel/craft knife
  • Glue stick (Pritt stick)

What to do:

1. Remove the wrappers from the crayons. You can use the scalpel to cut down the sides of the crayons if the wrappers are too difficult to remove by hand.


2. Organise them into the order that you want. I would recommend not putting the crayons exactly in colour order because then there would be a big block of the same colour, and it's nicer to have a bit of variation while still keeping the general rainbow effect.

3. Plug in your hot glue gun and put a line of glue where you want your first crayon to go. Stick down your first crayon but remember to be quick as the glue dries quite quickly! But once it's dry, it is very difficult to move or remove. Continue this for all the crayons.
4. With a pencil, sketch out the design that you want at the bottom of your canvas on your piece of paper or card. The classic thing to draw is someone holding an umbrella because when the wax melts, the majority of your design is shielded, and it just looks pretty!


5. Once you are happy with your design, go over the pencil lines with a black fine liner and cut out the design.

6. Cut out a couple of pieces of cardboard in the same shape as your design, stick them together and then stick your design on top using a glue stick or Pritt stick. The more layers of cardboard you use, the more your design will stick out and therefore the less chance that the wax, when you melt it, will drip onto your design.
7. Stick it all onto the canvas.


8. Switch your hairdryer onto the highest heat and power settings and get melting those crayons!

Monday, 23 September 2013

BEDSIDE TABLE TRANSFORMATION.

Ever since my bedroom was last decorated 5 years ago, I have had to live without a proper bedside table, so I resorted to creating my own makeshift table from a large set of green, plastic drawers with a very old yet tiny chair precariously sat on top. The purpose of the chair was to make the whole construction a bit taller and more accessible from my bed. I couldn't have a bedside lamp because the "table" wasn't stable enough to hold a lamp securely. I found it really annoying at night having to get out of bed, just when I'd gotten comfy and taken my glasses off, to turn my bedroom light off and then try and snuggle back down again. It was also very annoying reading at night as well because the bedroom light got too bright after a while and hurt my eyes when I was trying to read. What I really needed was a new bedside table, where I could position a nice, softly glowing lamp to read in - so I went out to IKEA again and got one! There is a link to the table that I bought on the IKEA website here.

I spotted this table when just browsing through the IKEA website, trying to see if there were any bedside tables that were long and thin to fit in the narrow gap between my bed and my wardrobe. I was extremely shocked but pleasantly surprised to see that this particular table had the perfect dimensions to be able to fit there! The table is completely white and is just a tiny bit taller than the top of my bed. It has one drawer at the front, which you can open by pulling on the bottom of the drawer. Because of this, I was thinking of getting a unique drawer handle to fix onto the front to make it easier to open. Inside, there is a little secret shelf above the actual drawer, which is quite useful for books or other items to keep them dust free.

Because there is a lot of space underneath the table, I tried fitting by school bag and portfolio in the gap (because they are always hanging around on the floor in my room) and they fit perfectly! It's a great place for them when I'm on my school holidays because I don't want my bag out all the time. It was as if IKEA made this table specifically for me - it's just so right! The purple lamp on top of the table is also from IKEA, however I bought it a couple of years ago, and it casts a beautiful soft purple glow (once the bulb gets warmed up!) which is perfect for reading in.

Before:


After:


Sunday, 22 September 2013

SOPHISTICATED EVENING OUT.

I wore this outfit for my friends' joint birthday party, which was at their parents' restaurant.


Jacket, shoes & watch
I talked about these three items more in my first outfit idea, which you can find here.

Top
This royal blue peplum top is by Redherring at Debenhams and, of course, I got it in the sale for a reduced price of £6! It is relatively thick compared to other peplum tops that I had tried on before finding this particular one. It has an interesting but soft texture, which the photo below has captured to some degree and the top has a mesh triangle on the back. The triangle doesn't go down super low but it is a nice little added touch. The peplum at the bottom of the top is really flattering on the female shape and emphasises your curves. It looks great under the blazer, which is quite straight, so there is a nice contrast between the fits of the two garments. I really love the vividness of this top - it's just such a gorgeous pop of blue amongst the other more neutral pieces.


Skirt
This simple black bodycon skirt is from Matalan and it probably cost about £5. I got it a couple of years ago and it has served me very well so far. It looks really good under the peplum top because of the contrast in fit again. I would definitely say that a black bodycon skirt is quite a staple to have in your wardrobe!


Disclaimer: I bought all of these items of clothing with my own money and photographed them myself.

Friday, 20 September 2013

STEAL OF THE WEEK: PURPLE CUSHION FROM ALDI.

I spotted this gorgeous purple cushion in Aldi (the home of bargains) for £2.99. I would have been happy to pay the original price of either £6.99 or £4.99 (I can't quite remember which!) because it looks a lot more expensive than it actually was! This is probably because it has this baroque-style pattern on it in a sort of shiny material, that looks different shades of purple when it catches the light differently.

I chose this cushion basically because my room is mostly purple (however, I will be changing the colour of the walls soon to white/grey/cream, but keeping the rest of the purple decor). It came with the inner cushion inside it already, and there is a zip across one of the longer edges so that you can remove the inner to wash the cover if need be. I think it goes quite nicely in my room, especially with this particular set of bedsheets. I will definitely be adding more to my collection of cushions in the near future!


Related Posts Plugin for WordPress, Blogger...