Sunday, 21 August 2016

WALL TAPESTRY FROM SOCIETY6.


Recently, I placed my first order at Society6. After a fair few hours(!) of pouring over all the pretty artwork appearing on my computer screen, I eventually settled on this small wall tapestry, measuring 51 inches tall by 60 inches wide.

The mandala design is by an artist called Nika - I just adore the colours and the intricate patterns in her work, especially this one! I managed to nab this wall tapestry during a 15% off + free delivery event so it was a tad cheaper than the base price on the website.

I really think wall tapestries are a great alternative to traditional framed wall art if you're not afraid to go big and make a statement with it. I hung mine in my bedroom at my parents' house and every time my mum comes into my room, she's always saying how much she likes it - I'm pretty sure she's gonna steal it as soon as I head back to uni!

Have you ever bought anything from Society6?


Follow

Sunday, 14 August 2016

DIY PROJECT: GIFTWRAP STORAGE BOXES.

I've got a really quick and easy DIY to fill an all-too-common rainy afternoon for you all today! Giftwrap storage boxes are a great idea if you want to make those functional but plain-looking shoe boxes a tad more appealing.

YOU WILL NEED:

Shoe box
Wrapping paper
Scissors
Mod podge
Paintbrush / foam paintbrush
Coloured paint (optional)

Choose just one or alternatively two complementary wrapping papers to wrap the box and the lid. Paint a thin layer of mod podge onto the box before placing your wrapping paper on and smoothing out any wrinkles or bubbles. You could even paint the lid a block colour to contrast with the wrapping paper if you wanted, but make sure to add enough coats and leave it to dry before using it.


You could even go for some festive wrapping paper if you were wanting to make some Christmassy storage boxes. Let me know what you make!


Follow

Sunday, 27 September 2015

DIY PROJECT: PERSONALISED PAPIER MACHE 'L'.


Today I thought I'd share a really quick and easy DIY with you all. It's a super cute way to personalise your room by proudly displaying the initial of your name.

All you need is:

A papier mâché letter - I got mine from Hobbycraft for £2
Old magazine pages
Pritt stick
Mod podge
Paintbrush

So literally all you do is cut or rip up the magazine pages into small pieces, and bit by bit layer them onto your letter using the Pritt stick. If you don't like the pattern of one of the pieces you've stuck on, just layer right over it! Finally, remember to give your final design a thin coat of mod podge with your paintbrush, just to make sure everything is sealed into place. If you wanted to, you could even come back to it some time in the future and layer over the whole thing if you were wanting to give it a different look, like using exclusively black and white images, or perhaps pages from an old book. The magazine pages I used for my letter were pretty vibrant and summery, which gives it a sort of tropical vibe.

This method of sticking lots of little pieces onto the letter is a lot easier than wrapping the whole letter in one single piece of paper or material. It doesn't have to look super neat, and you can do it easy peasy whilst watching your favourite Netflix series. Translation = watching the entirety of Pretty Little Liars all over again! If you wanted to, you could actually make one as a gift for a friend, by covering their initial in images of things you know they love. It's fairly inexpensive to make and it gives your present a bit of a personal touch - I actually did give one to a friend, and it went down a treat!


Follow

Wednesday, 27 August 2014

DIY PROJECT: GEOMETRIC ANIMAL WALL ART.


This project was very much inspired by Meg Allan Cole's fantastic DIY Geometric Bear video tutorial on HGTV Handmade. I have been in luuurve with this particular Youtube Channel for a fair few months now, and when I saw this little project appear in my subscriptions feed, I just had to have a go myself!

Monday, 7 July 2014

HOW TO ORGANISE YOUR CLOTHES DRAWERS.


The other day, I decided it was time to restructure the clothes in my wardrobe. I only wanted things that really needed to be hung up (like chiffon shirts, blazers and dresses) to be on hangers, and the rest of my clothes (like standard T-shirts and anything in that foldable jersey material) could be folded up and put into drawers. So, I hopped on over to Pinterest to try and find some practical ways of laying out my drawers. My main reasons for sorting them out were that I wanted to be able to see absolutely everything straight away when I open each drawer, instead of having to hunt through piles of clothes to find the one thing I have in mind. I also wanted to maximise the use of the space in each drawer, so that the clothes inside one won't catch on the drawer above when I try and open it.

The best way that I found to organise clothes drawers was by folding things as you normally would, like into quarters, then folding them again into thirds so you end up with a long strip, with the width of the garment about two to three times the height. You then put all the strips of clothes upright next to each other, without layering them on top of each other... Oh dear, I'm not doing a very good job of explaining this! Basically, everything is folded up thinly and placed vertically as opposed to horizontally along the bottom of the drawer. This way, you can see a thin snippet of each garment in the drawer at the same time. Just look at the photos below - you'll understand what I'm on about!


My drawers are quite small, but this style of organisation would also totally work in a dresser with wider drawers. To be honest, this would actually look so much neater in a wooden dresser - it's just my drawers are this weird metal mesh design, so the odd things kinda poke out the gaps, making the overall appearance look a little scruffy. Before I got these clothes organised, I always used to have to go rummaging through my drawers to find something to wear, and along the way I'd find things that I'd forgotten I even owned! But after sorting everything out like this, I'll never have that problem again! Now, all that's left to do is find a way to organise all my shoes…


Friday, 25 October 2013

MY BEDROOM WALLS.

From when I was about nine months old (that was the age I was when my family and I moved into the house in which we currently live), my bedroom walls were bright yellow or saffron. This was until I was about 11 or 12 years old and decided that this colour was a bit young for me and I wanted a room that was a bit more grown up. So we (well, when I say we, I mean my parents!) painted the walls a lavender-like colour because I was really into purple at the time. Literally everything I chose to go in my room was purple, and I mean everything: the walls, the carpet, the curtains, the lightshade, the bed covers, the lamp...! As you can probably guess, I didn't really have much of an idea about complementary or contrasting colours.

This summer, I decided once again that I'd had enough with the current state of my room and really wanted a more adult room. When I suggested the idea of changing the colour of my walls to my parents, I wasn't expecting them to agree with my idea but strangely they actually did get on board with the whole thing! We agreed that we would redecorate this autumn when I have two weeks off from school. I knew I wanted a more neutral room (kind of like a studio room) because then I would be able to add different coloured accessories to make the room more my own (plus I'd be able to put up my awesome retro canvases without their bold colours competing for attention with purple walls!). I couldn't decide between having white, grey or cream walls but I eventually decided on cream because it seemed the warmest option of the three. Now I'm really excited to see my room when it's finished and show it off on this blog!

Friday, 11 October 2013

STEAL OF THE WEEK: PUSH PINS FROM PAPERCHASE.

I paid a visit to Paperchase and picked up this pack of push pins or drawing pins (whatever you like to call them!) for £1.75 - reduced from £2.50. I am aware that you can get a pack of 200 from stores like Staples but those shops don't tell as cute stuff as this! In this pack, there are 18 little raindrop-shaped pins in assorted colours like purple and blue and there are two larger stripy cloud-shaped pins in similar colours. I got these because they go really nicely with the colour scheme of my room. Now I just need to find myself a board to use them on...!!


Monday, 30 September 2013

MAGAZINE FILES.

I wanted to get some new magazine files that were actually sturdy and could hold my school textbooks without falling apart whenever I tried to lift them up, so I went to (yeah, you guessed it) IKEA to buy this pack of 2 magazine files. These files are very strong and have metal corners and edges for extra reinforcement. They cost me £3.75 for the pack of 2 and they came flat in the packet so I had to build them myself. There were a few small slips of white card included for me to label the contents of the files, so I just made mine using a black fine liner to organise my AS and A2 Level textbooks separately. 

There are a few different colour options on the IKEA website here.


Wednesday, 25 September 2013

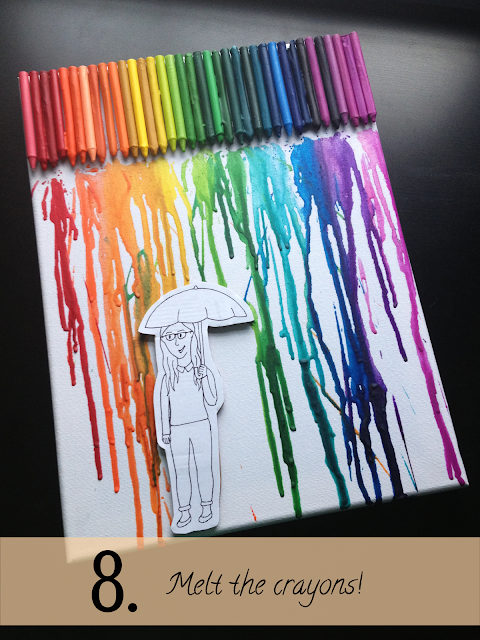
DIY PROJECT: MELTED CRAYON RAINBOW ART.

I'd seen many people on the Internet doing this awesome art project, so I thought I'd give it a go. It only cost me £1 altogether because the only thing I needed was the canvas! I found the crayons in the spare room when tidying up in there, I borrowed the hot glue gun from my nan and I already had the rest of the materials.


All the stuff you need:
  • Plain white canvas
  • A spectrum of crayons
  • Hot glue gun (with extra glue sticks)
  • Hairdryer
  • Cardboard (from an Amazon box or something similar)
  • Pencil, rubber and black fine liner
  • Sheet of white paper or card
  • Scalpel/craft knife
  • Glue stick (Pritt stick)

What to do:

1. Remove the wrappers from the crayons. You can use the scalpel to cut down the sides of the crayons if the wrappers are too difficult to remove by hand.


2. Organise them into the order that you want. I would recommend not putting the crayons exactly in colour order because then there would be a big block of the same colour, and it's nicer to have a bit of variation while still keeping the general rainbow effect.

3. Plug in your hot glue gun and put a line of glue where you want your first crayon to go. Stick down your first crayon but remember to be quick as the glue dries quite quickly! But once it's dry, it is very difficult to move or remove. Continue this for all the crayons.
4. With a pencil, sketch out the design that you want at the bottom of your canvas on your piece of paper or card. The classic thing to draw is someone holding an umbrella because when the wax melts, the majority of your design is shielded, and it just looks pretty!


5. Once you are happy with your design, go over the pencil lines with a black fine liner and cut out the design.

6. Cut out a couple of pieces of cardboard in the same shape as your design, stick them together and then stick your design on top using a glue stick or Pritt stick. The more layers of cardboard you use, the more your design will stick out and therefore the less chance that the wax, when you melt it, will drip onto your design.
7. Stick it all onto the canvas.


8. Switch your hairdryer onto the highest heat and power settings and get melting those crayons!

Monday, 23 September 2013

BEDSIDE TABLE TRANSFORMATION.

Ever since my bedroom was last decorated 5 years ago, I have had to live without a proper bedside table, so I resorted to creating my own makeshift table from a large set of green, plastic drawers with a very old yet tiny chair precariously sat on top. The purpose of the chair was to make the whole construction a bit taller and more accessible from my bed. I couldn't have a bedside lamp because the "table" wasn't stable enough to hold a lamp securely. I found it really annoying at night having to get out of bed, just when I'd gotten comfy and taken my glasses off, to turn my bedroom light off and then try and snuggle back down again. It was also very annoying reading at night as well because the bedroom light got too bright after a while and hurt my eyes when I was trying to read. What I really needed was a new bedside table, where I could position a nice, softly glowing lamp to read in - so I went out to IKEA again and got one! There is a link to the table that I bought on the IKEA website here.

I spotted this table when just browsing through the IKEA website, trying to see if there were any bedside tables that were long and thin to fit in the narrow gap between my bed and my wardrobe. I was extremely shocked but pleasantly surprised to see that this particular table had the perfect dimensions to be able to fit there! The table is completely white and is just a tiny bit taller than the top of my bed. It has one drawer at the front, which you can open by pulling on the bottom of the drawer. Because of this, I was thinking of getting a unique drawer handle to fix onto the front to make it easier to open. Inside, there is a little secret shelf above the actual drawer, which is quite useful for books or other items to keep them dust free.

Because there is a lot of space underneath the table, I tried fitting by school bag and portfolio in the gap (because they are always hanging around on the floor in my room) and they fit perfectly! It's a great place for them when I'm on my school holidays because I don't want my bag out all the time. It was as if IKEA made this table specifically for me - it's just so right! The purple lamp on top of the table is also from IKEA, however I bought it a couple of years ago, and it casts a beautiful soft purple glow (once the bulb gets warmed up!) which is perfect for reading in.

Before:


After:


Friday, 20 September 2013

STEAL OF THE WEEK: PURPLE CUSHION FROM ALDI.

I spotted this gorgeous purple cushion in Aldi (the home of bargains) for £2.99. I would have been happy to pay the original price of either £6.99 or £4.99 (I can't quite remember which!) because it looks a lot more expensive than it actually was! This is probably because it has this baroque-style pattern on it in a sort of shiny material, that looks different shades of purple when it catches the light differently.

I chose this cushion basically because my room is mostly purple (however, I will be changing the colour of the walls soon to white/grey/cream, but keeping the rest of the purple decor). It came with the inner cushion inside it already, and there is a zip across one of the longer edges so that you can remove the inner to wash the cover if need be. I think it goes quite nicely in my room, especially with this particular set of bedsheets. I will definitely be adding more to my collection of cushions in the near future!


Wednesday, 18 September 2013

MORE PINTEREST INSPIRATION.

I love this family tree themed wall and how the photos are in monochrome against the mint wall.
Brilliant idea - making decor mirrors out of vintage tennis racquets!
Surrounded by inspiration.
I want to do this to my wall - it's such a good idea!
Adorable.

Wednesday, 11 September 2013

A TRIP TO IKEA.

My parents and I went to IKEA to look for a hanging wardrobe organiser for my room. I had seen a few relatively inexpensive ones (about £4-6) on the website that I wanted to check out in person before I bought one of them. However, when I did see them in real life, they were of quite a thin, plastic material that didn't feel particularly sturdy. I then spotted a larger organiser with 7 compartments, made out of a strong, canvas material with thick cardboard sewn inside the material shelves to give it more structure and strength. I had actually seen this one on the website, but immediately discarded it because I didn't like the beige/brown flowers design; it seemed quite old fashioned. In reality, however, it appealed to me a lot more. It has pockets and areas to hang belts and scarves on both sides. I think because of the durability of this organiser, it is a brilliant investment for £13. You can find a link to it on the IKEA website here.


I was walking through the rest of the store, (it takes so long to get out of IKEA; it's basically a maze!) and I spotted some plain cushions, 50x50cm in size, in different colours: red, orange, white, etc... so I picked a white one up for £3, as I am planning to make some nice cushion covers. There is a link to it here.


Related Posts Plugin for WordPress, Blogger...