Sunday, 14 August 2016

DIY PROJECT: GIFTWRAP STORAGE BOXES.

I've got a really quick and easy DIY to fill an all-too-common rainy afternoon for you all today! Giftwrap storage boxes are a great idea if you want to make those functional but plain-looking shoe boxes a tad more appealing.

YOU WILL NEED:

Shoe box
Wrapping paper
Scissors
Mod podge
Paintbrush / foam paintbrush
Coloured paint (optional)

Choose just one or alternatively two complementary wrapping papers to wrap the box and the lid. Paint a thin layer of mod podge onto the box before placing your wrapping paper on and smoothing out any wrinkles or bubbles. You could even paint the lid a block colour to contrast with the wrapping paper if you wanted, but make sure to add enough coats and leave it to dry before using it.


You could even go for some festive wrapping paper if you were wanting to make some Christmassy storage boxes. Let me know what you make!


Follow

Sunday, 27 September 2015

DIY PROJECT: PERSONALISED PAPIER MACHE 'L'.


Today I thought I'd share a really quick and easy DIY with you all. It's a super cute way to personalise your room by proudly displaying the initial of your name.

All you need is:

A papier mâché letter - I got mine from Hobbycraft for £2
Old magazine pages
Pritt stick
Mod podge
Paintbrush

So literally all you do is cut or rip up the magazine pages into small pieces, and bit by bit layer them onto your letter using the Pritt stick. If you don't like the pattern of one of the pieces you've stuck on, just layer right over it! Finally, remember to give your final design a thin coat of mod podge with your paintbrush, just to make sure everything is sealed into place. If you wanted to, you could even come back to it some time in the future and layer over the whole thing if you were wanting to give it a different look, like using exclusively black and white images, or perhaps pages from an old book. The magazine pages I used for my letter were pretty vibrant and summery, which gives it a sort of tropical vibe.

This method of sticking lots of little pieces onto the letter is a lot easier than wrapping the whole letter in one single piece of paper or material. It doesn't have to look super neat, and you can do it easy peasy whilst watching your favourite Netflix series. Translation = watching the entirety of Pretty Little Liars all over again! If you wanted to, you could actually make one as a gift for a friend, by covering their initial in images of things you know they love. It's fairly inexpensive to make and it gives your present a bit of a personal touch - I actually did give one to a friend, and it went down a treat!


Follow

Friday, 28 August 2015

DIY PROJECT: UPCYCLED MAP-COVERED PHOTO ALBUMS.

Over the summer I decided to have a go at updating an old photo album of mine. It was one that I had acquired when I was quite a bit younger (and very interested in fairies, as you can see below).


I found a pile of old National Geographic maps whilst tidying the house, and thought it would be a great idea to use one to redecorate this photo album. So I gave it a go with the materials that I had lying around the house, and it actually worked out wayyy better than I'd predicted - my parents were really impressed and told me that the finished album looked really professional. So here is how to make your very own map-covered photo album.

Wednesday, 27 August 2014

DIY PROJECT: GEOMETRIC ANIMAL WALL ART.


This project was very much inspired by Meg Allan Cole's fantastic DIY Geometric Bear video tutorial on HGTV Handmade. I have been in luuurve with this particular Youtube Channel for a fair few months now, and when I saw this little project appear in my subscriptions feed, I just had to have a go myself!

Friday, 11 July 2014

DIY PROJECT: GEOMETRIC NOTEBOOK.


I first saw this notebook DIY on Melisa's blog Pie N' the Sky a while back, which in turn was inspired by Elsie's DIY wall art post on A Beautiful Mess. I'd bought this plain, reddy-pink notebook from IKEA, which I was wanting to spruce up a bit and make more personal, and what better way to do it than to decorate it with this brilliant geometric design. This DIY looked like a really quick and simple project but with a very striking result, so I thought I'd give it a go. All you need is: a notebook (obviously!), old magazine pages that you're willing to cut up, a glue stick, scissors, mod podge, a paintbrush, and a pencil and ruler for measuring the size of your triangle template. Go visit Melisa's original post for a full list of instructions.


An added tip that I discovered whilst decorating my own notebook, which makes cutting out the same size triangle multiple times a whole lot easier, is to draw your triangle template onto a post-it note, with part of the sticky bit on the back of your triangle. Then, cut out the post-it triangle. Now, when you want to cut out a section of magazine, [1] you don't have to draw the same shape on every bit of magazine you want to use, and [2] you can stick the post-it wherever you want on the page, and when you hold up the page to cut the shape out, the template won't move around or fall off. Plus, if you're not happy with where it is initially, you can easily peel it off and re-stick it somewhere else on the page!


I ended up putting a little bit too much mod podge on my notebook when sealing my design at the end, so some of the edges of my triangles crinkled up a bit. If you're gonna have a go at this, I'd suggest just adding small amounts of mod podge at a time, and smoothing it out carefully before it dries. But to be honest, it's hardly noticeable once it's dry, so if you make the same mistake as me, don't fret about it - just enjoy making and using your beautiful, new notebook!


Friday, 30 May 2014

MINI HANDMADE NOTEBOOKS.


I was just scrolling through the DIY projects on A Beautiful Mess' blog a while ago when I stumbled upon this adorable little afternoon filler. You only need bits and bobs from around the house to make these cute mini notebooks: old magazine pages, paper, washi tape, etc... (a full list of supplies is on their original post here). I thought I'd give it a go and these are the creations I came up with!


Wednesday, 25 September 2013

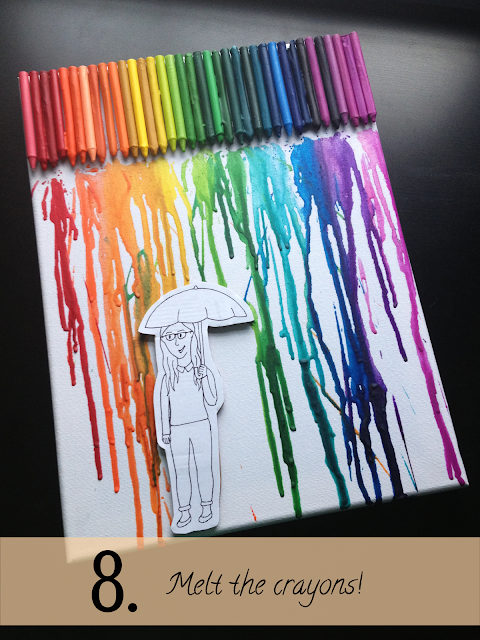
DIY PROJECT: MELTED CRAYON RAINBOW ART.

I'd seen many people on the Internet doing this awesome art project, so I thought I'd give it a go. It only cost me £1 altogether because the only thing I needed was the canvas! I found the crayons in the spare room when tidying up in there, I borrowed the hot glue gun from my nan and I already had the rest of the materials.


All the stuff you need:
  • Plain white canvas
  • A spectrum of crayons
  • Hot glue gun (with extra glue sticks)
  • Hairdryer
  • Cardboard (from an Amazon box or something similar)
  • Pencil, rubber and black fine liner
  • Sheet of white paper or card
  • Scalpel/craft knife
  • Glue stick (Pritt stick)

What to do:

1. Remove the wrappers from the crayons. You can use the scalpel to cut down the sides of the crayons if the wrappers are too difficult to remove by hand.


2. Organise them into the order that you want. I would recommend not putting the crayons exactly in colour order because then there would be a big block of the same colour, and it's nicer to have a bit of variation while still keeping the general rainbow effect.

3. Plug in your hot glue gun and put a line of glue where you want your first crayon to go. Stick down your first crayon but remember to be quick as the glue dries quite quickly! But once it's dry, it is very difficult to move or remove. Continue this for all the crayons.
4. With a pencil, sketch out the design that you want at the bottom of your canvas on your piece of paper or card. The classic thing to draw is someone holding an umbrella because when the wax melts, the majority of your design is shielded, and it just looks pretty!


5. Once you are happy with your design, go over the pencil lines with a black fine liner and cut out the design.

6. Cut out a couple of pieces of cardboard in the same shape as your design, stick them together and then stick your design on top using a glue stick or Pritt stick. The more layers of cardboard you use, the more your design will stick out and therefore the less chance that the wax, when you melt it, will drip onto your design.
7. Stick it all onto the canvas.


8. Switch your hairdryer onto the highest heat and power settings and get melting those crayons!
Related Posts Plugin for WordPress, Blogger...