Sunday, 21 August 2016

WALL TAPESTRY FROM SOCIETY6.


Recently, I placed my first order at Society6. After a fair few hours(!) of pouring over all the pretty artwork appearing on my computer screen, I eventually settled on this small wall tapestry, measuring 51 inches tall by 60 inches wide.

The mandala design is by an artist called Nika - I just adore the colours and the intricate patterns in her work, especially this one! I managed to nab this wall tapestry during a 15% off + free delivery event so it was a tad cheaper than the base price on the website.

I really think wall tapestries are a great alternative to traditional framed wall art if you're not afraid to go big and make a statement with it. I hung mine in my bedroom at my parents' house and every time my mum comes into my room, she's always saying how much she likes it - I'm pretty sure she's gonna steal it as soon as I head back to uni!

Have you ever bought anything from Society6?


Follow

Sunday, 17 July 2016

MY TOP 5 ONLINE SHOPS FOR BUYING INDEPENDENT ARTISTS' WORK.


I've raved about Ohh Deer before on this blog and I ain't about to quit now! They sell a massive variety of products featuring work by a load of different artists including Gemma Correll and Andreas Lie (my faves), and they offer a 10% discount for all you thrifty students out there. The site will often have events like 'Free Delivery on orders over £10' or an increased student discount for a limited time too - you can't really go wrong shopping here.

At Society6, they sell an even wider range of products than Ohh Deer, although I find them to be at slightly higher prices. However, if you make your order during a free shipping or discount event, things become a lot more affordable. Being a larger company based in the US, international shipping is also required for us Brits, but in my experience it's well worth it. I ordered a wall tapestry from Society6 and it came much earlier than estimated, and the piece itself was gorgeous. 

I discovered this website on the back of a greeting card at the gift shop at Wollaton Hall, and when I went home to check it out, I was not disappointed. Based in the UK, Wraptious is a smaller company that sells more animal-centric products by incredibly talented artists. And what's more is that all UK orders qualify for free shipping(!) and for the rest of the world they offer incredibly affordable rates. 

A small studio focussing more on greetings cards and gifts, they offer adorable products featuring clever designs and witty quotes. I actually noticed this shop whilst walking around Bristol, and I'm very glad I made a note of it as they also offer free shipping on all UK orders (woohoo!).

Possibly the most well-known of these five sites, Redbubble has over 400,000 independent artists contributing to a massive creative community. You can find pretty much anything on there, from a T-shirt of Pikachu dressed as Batman to a drama llama-themed iPhone case. What more could you possibly ask for?!


Follow

Wednesday, 27 August 2014

DIY PROJECT: GEOMETRIC ANIMAL WALL ART.


This project was very much inspired by Meg Allan Cole's fantastic DIY Geometric Bear video tutorial on HGTV Handmade. I have been in luuurve with this particular Youtube Channel for a fair few months now, and when I saw this little project appear in my subscriptions feed, I just had to have a go myself!

Wednesday, 25 September 2013

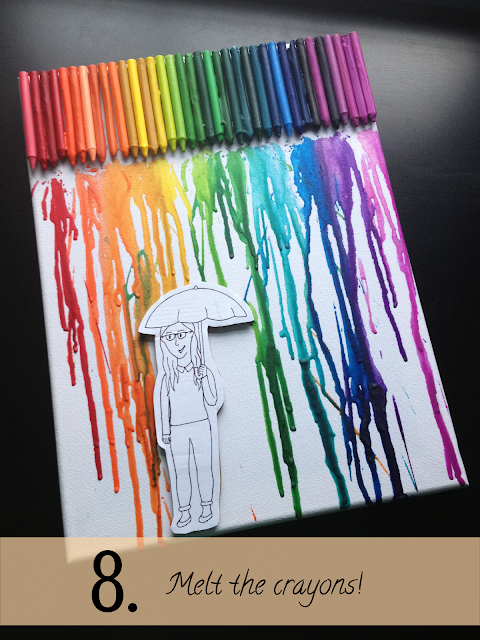
DIY PROJECT: MELTED CRAYON RAINBOW ART.

I'd seen many people on the Internet doing this awesome art project, so I thought I'd give it a go. It only cost me £1 altogether because the only thing I needed was the canvas! I found the crayons in the spare room when tidying up in there, I borrowed the hot glue gun from my nan and I already had the rest of the materials.


All the stuff you need:
  • Plain white canvas
  • A spectrum of crayons
  • Hot glue gun (with extra glue sticks)
  • Hairdryer
  • Cardboard (from an Amazon box or something similar)
  • Pencil, rubber and black fine liner
  • Sheet of white paper or card
  • Scalpel/craft knife
  • Glue stick (Pritt stick)

What to do:

1. Remove the wrappers from the crayons. You can use the scalpel to cut down the sides of the crayons if the wrappers are too difficult to remove by hand.


2. Organise them into the order that you want. I would recommend not putting the crayons exactly in colour order because then there would be a big block of the same colour, and it's nicer to have a bit of variation while still keeping the general rainbow effect.

3. Plug in your hot glue gun and put a line of glue where you want your first crayon to go. Stick down your first crayon but remember to be quick as the glue dries quite quickly! But once it's dry, it is very difficult to move or remove. Continue this for all the crayons.
4. With a pencil, sketch out the design that you want at the bottom of your canvas on your piece of paper or card. The classic thing to draw is someone holding an umbrella because when the wax melts, the majority of your design is shielded, and it just looks pretty!


5. Once you are happy with your design, go over the pencil lines with a black fine liner and cut out the design.

6. Cut out a couple of pieces of cardboard in the same shape as your design, stick them together and then stick your design on top using a glue stick or Pritt stick. The more layers of cardboard you use, the more your design will stick out and therefore the less chance that the wax, when you melt it, will drip onto your design.
7. Stick it all onto the canvas.


8. Switch your hairdryer onto the highest heat and power settings and get melting those crayons!
Related Posts Plugin for WordPress, Blogger...