Monday, 30 September 2013

MAGAZINE FILES.

I wanted to get some new magazine files that were actually sturdy and could hold my school textbooks without falling apart whenever I tried to lift them up, so I went to (yeah, you guessed it) IKEA to buy this pack of 2 magazine files. These files are very strong and have metal corners and edges for extra reinforcement. They cost me £3.75 for the pack of 2 and they came flat in the packet so I had to build them myself. There were a few small slips of white card included for me to label the contents of the files, so I just made mine using a black fine liner to organise my AS and A2 Level textbooks separately. 

There are a few different colour options on the IKEA website here.


Wednesday, 25 September 2013

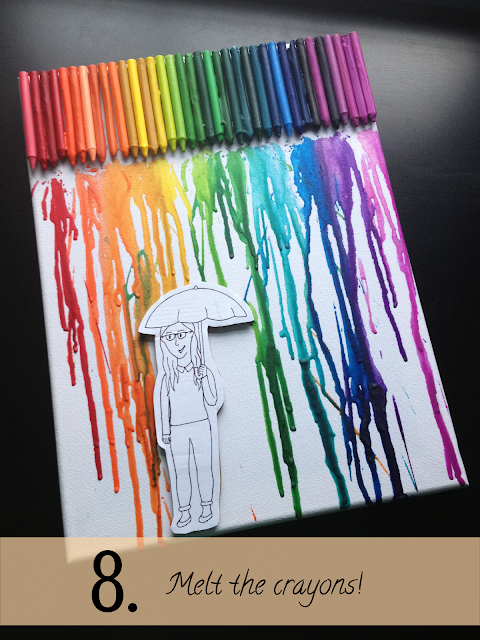
DIY PROJECT: MELTED CRAYON RAINBOW ART.

I'd seen many people on the Internet doing this awesome art project, so I thought I'd give it a go. It only cost me £1 altogether because the only thing I needed was the canvas! I found the crayons in the spare room when tidying up in there, I borrowed the hot glue gun from my nan and I already had the rest of the materials.


All the stuff you need:
  • Plain white canvas
  • A spectrum of crayons
  • Hot glue gun (with extra glue sticks)
  • Hairdryer
  • Cardboard (from an Amazon box or something similar)
  • Pencil, rubber and black fine liner
  • Sheet of white paper or card
  • Scalpel/craft knife
  • Glue stick (Pritt stick)

What to do:

1. Remove the wrappers from the crayons. You can use the scalpel to cut down the sides of the crayons if the wrappers are too difficult to remove by hand.


2. Organise them into the order that you want. I would recommend not putting the crayons exactly in colour order because then there would be a big block of the same colour, and it's nicer to have a bit of variation while still keeping the general rainbow effect.

3. Plug in your hot glue gun and put a line of glue where you want your first crayon to go. Stick down your first crayon but remember to be quick as the glue dries quite quickly! But once it's dry, it is very difficult to move or remove. Continue this for all the crayons.
4. With a pencil, sketch out the design that you want at the bottom of your canvas on your piece of paper or card. The classic thing to draw is someone holding an umbrella because when the wax melts, the majority of your design is shielded, and it just looks pretty!


5. Once you are happy with your design, go over the pencil lines with a black fine liner and cut out the design.

6. Cut out a couple of pieces of cardboard in the same shape as your design, stick them together and then stick your design on top using a glue stick or Pritt stick. The more layers of cardboard you use, the more your design will stick out and therefore the less chance that the wax, when you melt it, will drip onto your design.
7. Stick it all onto the canvas.


8. Switch your hairdryer onto the highest heat and power settings and get melting those crayons!

Monday, 23 September 2013

BEDSIDE TABLE TRANSFORMATION.

Ever since my bedroom was last decorated 5 years ago, I have had to live without a proper bedside table, so I resorted to creating my own makeshift table from a large set of green, plastic drawers with a very old yet tiny chair precariously sat on top. The purpose of the chair was to make the whole construction a bit taller and more accessible from my bed. I couldn't have a bedside lamp because the "table" wasn't stable enough to hold a lamp securely. I found it really annoying at night having to get out of bed, just when I'd gotten comfy and taken my glasses off, to turn my bedroom light off and then try and snuggle back down again. It was also very annoying reading at night as well because the bedroom light got too bright after a while and hurt my eyes when I was trying to read. What I really needed was a new bedside table, where I could position a nice, softly glowing lamp to read in - so I went out to IKEA again and got one! There is a link to the table that I bought on the IKEA website here.

I spotted this table when just browsing through the IKEA website, trying to see if there were any bedside tables that were long and thin to fit in the narrow gap between my bed and my wardrobe. I was extremely shocked but pleasantly surprised to see that this particular table had the perfect dimensions to be able to fit there! The table is completely white and is just a tiny bit taller than the top of my bed. It has one drawer at the front, which you can open by pulling on the bottom of the drawer. Because of this, I was thinking of getting a unique drawer handle to fix onto the front to make it easier to open. Inside, there is a little secret shelf above the actual drawer, which is quite useful for books or other items to keep them dust free.

Because there is a lot of space underneath the table, I tried fitting by school bag and portfolio in the gap (because they are always hanging around on the floor in my room) and they fit perfectly! It's a great place for them when I'm on my school holidays because I don't want my bag out all the time. It was as if IKEA made this table specifically for me - it's just so right! The purple lamp on top of the table is also from IKEA, however I bought it a couple of years ago, and it casts a beautiful soft purple glow (once the bulb gets warmed up!) which is perfect for reading in.

Before:


After:


Sunday, 22 September 2013

SOPHISTICATED EVENING OUT.

I wore this outfit for my friends' joint birthday party, which was at their parents' restaurant.


Jacket, shoes & watch
I talked about these three items more in my first outfit idea, which you can find here.

Top
This royal blue peplum top is by Redherring at Debenhams and, of course, I got it in the sale for a reduced price of £6! It is relatively thick compared to other peplum tops that I had tried on before finding this particular one. It has an interesting but soft texture, which the photo below has captured to some degree and the top has a mesh triangle on the back. The triangle doesn't go down super low but it is a nice little added touch. The peplum at the bottom of the top is really flattering on the female shape and emphasises your curves. It looks great under the blazer, which is quite straight, so there is a nice contrast between the fits of the two garments. I really love the vividness of this top - it's just such a gorgeous pop of blue amongst the other more neutral pieces.


Skirt
This simple black bodycon skirt is from Matalan and it probably cost about £5. I got it a couple of years ago and it has served me very well so far. It looks really good under the peplum top because of the contrast in fit again. I would definitely say that a black bodycon skirt is quite a staple to have in your wardrobe!


Disclaimer: I bought all of these items of clothing with my own money and photographed them myself.

Friday, 20 September 2013

STEAL OF THE WEEK: PURPLE CUSHION FROM ALDI.

I spotted this gorgeous purple cushion in Aldi (the home of bargains) for £2.99. I would have been happy to pay the original price of either £6.99 or £4.99 (I can't quite remember which!) because it looks a lot more expensive than it actually was! This is probably because it has this baroque-style pattern on it in a sort of shiny material, that looks different shades of purple when it catches the light differently.

I chose this cushion basically because my room is mostly purple (however, I will be changing the colour of the walls soon to white/grey/cream, but keeping the rest of the purple decor). It came with the inner cushion inside it already, and there is a zip across one of the longer edges so that you can remove the inner to wash the cover if need be. I think it goes quite nicely in my room, especially with this particular set of bedsheets. I will definitely be adding more to my collection of cushions in the near future!


Wednesday, 18 September 2013

MORE PINTEREST INSPIRATION.

I love this family tree themed wall and how the photos are in monochrome against the mint wall.
Brilliant idea - making decor mirrors out of vintage tennis racquets!
Surrounded by inspiration.
I want to do this to my wall - it's such a good idea!
Adorable.

Monday, 16 September 2013

SHANGRI-LA BATH GIFT SET PACKAGING.

A few weeks ago, I gave this bath gift set to a friend for their birthday, but before I did, I just had to take a few photos of it because I think that the packaging is just so pretty. I didn't get any photos of inside the gift set because I didn't want to open it, since it was a present. I bought this from TKMaxx, however you can see more of the products from this collection on fragrancedirect.co.uk here.


Sunday, 15 September 2013

OUTFIT FOR A GIG/CONCERT.

I've never actually been to a proper gig or a concert before, unless you count the time I went to a Girl Guides event where some not-very-well-known bands played some never-before-heard songs for us and we screamed at them whilst wearing our Guides uniforms, trainers and bunny ears. I created this outfit so that when I do finally go and see one of my favourite artists or bands perform, I'll know immediately what to wear.

Jacket
The jacket is my £8 light blue denim jacket from M&S. I wrote a more detailed post about it here.

Shirt
The top has the year 1985 written on it in the design of multicoloured beads and gems. It cost me about £10 and it was from H&M. I like the idea of this top because you don't need to accessorise with a necklace because of the jewellery design adds the colour already. Besides, I wouldn't want a necklace smacking me in the face if I was jumping around at a gig!

Skirt
This light grey bodycon skirt is also from H&M and cost me £2 - it was in the sale! I thought this skirt was a good idea because the fact that it's fitted contrasts with the boxy top and bulky jacket.

Boots
I got these combat boots from New Look. I seem to remember that I bought them incredibly reduced in a sale at about £3. They would be very comfortable for walking around in and also for staying stood up for a long time at a concert.

NB: I would recommend taking an across the body bag for convenience and practicality.


Disclaimer: I bought all of these items of clothing with my own money and photographed them myself.

Friday, 13 September 2013

STEAL OF THE WEEK: DENIM JACKET FROM M&S.

Not long ago, I went shopping with my mum, and whenever I go shopping with my mum, we always have to pay a visit to M&S. Most of the clothes that are sold in this particular shop are for more mature women; not usually for young people like myself. On occasions before, I have managed to find the odd gem that looks quite youthful in this store. So, we were routing around in the final reductions section when my mum found this denim jacket. When she showed it to me, I immediately fell in love with it. 

It is a light blue denim jacket, very slightly cropped, with quite a large fit. What I mean by this is that it isn't fitted; you could quite easily layer things up beneath it in the winter. Before we found this jacket, I had already been looking around for one and successfully purchased a different denim jacket from H&M. That jacket was darker and of a slimmer fit and therefore, I think, slightly more formal than this one from M&S. I did decide to get this jacket as well because of the difference in colour and fit. Also, who could leave a denim jacket that cost only £8 - yes £8! - on the rail? I believe it was reduced from about £35, so it was a complete bargain!

It was only when I got home that I also realised that my new jacket had two inside pockets as well as the two on the outside! This makes it even more practical and wearable in day to day life for me.


 I really love the pattern of the material inside the sleeves of this jacket!


Wednesday, 11 September 2013

A TRIP TO IKEA.

My parents and I went to IKEA to look for a hanging wardrobe organiser for my room. I had seen a few relatively inexpensive ones (about £4-6) on the website that I wanted to check out in person before I bought one of them. However, when I did see them in real life, they were of quite a thin, plastic material that didn't feel particularly sturdy. I then spotted a larger organiser with 7 compartments, made out of a strong, canvas material with thick cardboard sewn inside the material shelves to give it more structure and strength. I had actually seen this one on the website, but immediately discarded it because I didn't like the beige/brown flowers design; it seemed quite old fashioned. In reality, however, it appealed to me a lot more. It has pockets and areas to hang belts and scarves on both sides. I think because of the durability of this organiser, it is a brilliant investment for £13. You can find a link to it on the IKEA website here.


I was walking through the rest of the store, (it takes so long to get out of IKEA; it's basically a maze!) and I spotted some plain cushions, 50x50cm in size, in different colours: red, orange, white, etc... so I picked a white one up for £3, as I am planning to make some nice cushion covers. There is a link to it here.


Monday, 9 September 2013

DIY OMBRÉ HAIR.

I'd been wanting to ombré my hair for about a year when I finally plucked up the courage to buy a DIY ombré kit. Even once I had bought it, I didn't actually use it for a couple of months, until I just thought "Right. I might as well just go for it!" I had decided not to get it done professionally, firstly because it would have cost about £50, and secondly because I just wanted to experiment with it. If I'd ended up disliking it I wouldn't have wanted to ask my mum to get it dyed back straight away - she would have gone mental!


The kit that I ended up buying was the L'Oréal Paris Wild Ombrés Préférence kit in no.1 for light brown to dark brown hair. It cost £6.99 from Boots; there's a link to it on the Boots website here. I basically just walked into the shop and chose this kit because it was the only one on the shelf that was advertised as being a product to create an ombré hairstyle; the other kits there were just for getting completely blonde hair or blonde highlights. Another reason I picked this one is because the packaging said that it came with an "expert brush" to comb the dye into the hair for a more natural gradient.


So when the time came to actually doing it, I mixed the different brightening products together and squirted the dye from the applicator bottle onto the brush, following the instructions closely. I started applying the dye the way the instructions said: starting at the top and combing down through the hair towards the ends. This seemed a bit strange to me; I thought that you would have had to begin at the bottom and work upwards to where you wanted it, but I fought the urge to defy the instructions because I believed that they would give me the best result.

The instructions provided also only show you what to do if you are dyeing your hair alone, with nobody to help. They tell you to part your hair in the middle and bring each side over your shoulders. Then, apply the dye on your hair at the back and work your way towards the hair around your face, which would mean that you would end up with a line that dips down at the back when you put all your hair behind your shoulders again. At this point, I got my mum to make sure the dye was vaguely level with a point just under my chin all the way round my head.

Okay, before we go on any further, it has to be said: the smell of the dye was horrific. If you are thinking of dyeing your hair at home, and with this kit especially, make sure you don't have a sensitive gag reflex because it was pretty smelly. The "expert brush" included in the kit was extremely useful and did give more natural results, however I found it difficult to get the product to stay in the very ends of my hair, so some strands of hair are still my natural brown colour at the tips.

The instructions said to only leave the dye on for between 25 and 45 minutes; I would say I left it on my hair for about 40 minutes. The following photos are before and after using the kit.

Before.
After.

Because this was the first time I had ever dyed my hair myself, I was quite pleased with the end result. It didn't end up with a really obvious line dividing my hair colour from the lighter colour, but it isn't the most natural gradient either. Because this ombré kit uses brightening products, the end result basically depends on your natural hair colour. In some lights my hair appears to have some ginger tones in it, which is weird but kinda cool!

Taking into account the price, the accuracy of the instructions for the best result, the tools provided and the final outcome, I would give this kit a rating of 3 stars out of 5.


If you were to try this too, I would recommend working from the bottom up to make sure that the ends of your hair are the lightest and get increasingly darker as you go up towards the point where you want to leave it your natural hair colour.

Sunday, 8 September 2013

CASUAL SUMMER/AUTUMN OUTFIT.

It's that really annoying time of the year in the UK again, when it's just a bit too cold to keep wearing shorts but not cold enough for thick, fluffy hoodies. I know that many people find it difficult to work out what to wear during this transition period but hopefully this post will help.


Jumper
I got this jumper quite recently from H&M for £12.99 and it is a brilliant layering item. Despite the fact that it looks woolly, the maroon/burgundy coloured jumper is 55% acrylic and 45% polyamide, which gives it an interesting texture but is very comfortable to wear. It is a slightly open knit jumper, which means that you can just about see the colour of the garment you are wearing underneath through it. The jumper doesn't weigh very much compared to woollen jumpers and the slightly boxy fit makes it quite airy. It has 3/4 length sleeves, which is great for creating that horizontal line level with your waist to accentuate your body shape and give it more of a feminine touch.


Shirt
I added a white polo shirt, buttoned up to the top, underneath the jumper to give the outfit more of a smart, preppy look. It also creates more of a contrast with the dark jumper and the bright, white shirt poking through. I bought this a while ago from H&M for between £5 and £8.

Jeggings
These patterned navy blue jeggings aren't really the fit that a jegging usually is, but that is what M&S have decided to call them; I would say the fit is closer to a slim leg or skinny jean. The bird print reminds me more of summer but the colour scheme in the whole trousers is more a palette associated with autumn, which is why I think these are a great piece of clothing to wear at this time of year. They were originally priced at £25, but I bought them for £18 from the M&S Outlet.


Shoes
These shoes are a bit grubby now because I've worn them so much - they are really comfortable! I also got these from M&S for about £10 in the sale. I thought that another pop of white at the bottom of the outfit would really brighten everything up a bit.

You could wear ballet flats instead of the pumps, as well as some jewellery to make this slightly more of a formal look.


Disclaimer: I bought all of these items of clothing with my own money and photographed them myself.
Related Posts Plugin for WordPress, Blogger...